The order sync setting is used to sync the order from WooCommerce to NetSuite. Orders are synced when created, updated or deleted. Orders can be synced manually or automatically. Along with default settings, there is a feature for Conditional Mapping as well. With Conditional Mapping, you can map all NetSuite Order’s default and custom fields like SalesRep, Location, Class or any other custom field.
Order Settings
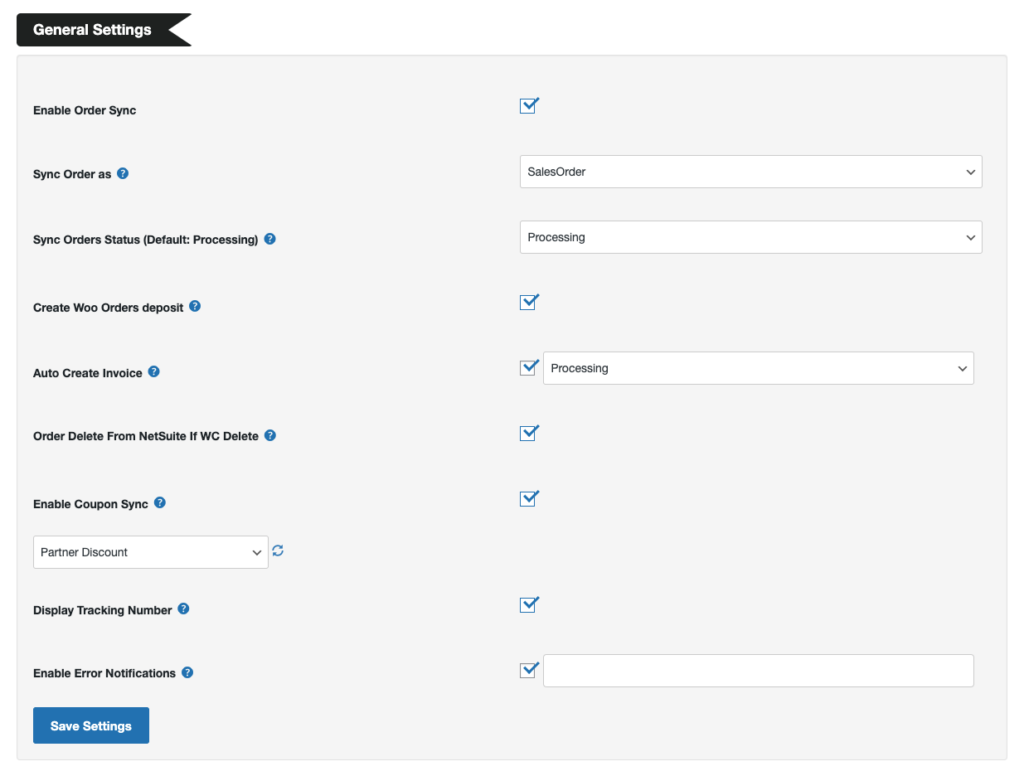
General Settings

- Enable Order Sync: Enable for Order Sync.
- Sync Order As: Enables syncing of an order either as a ‘Sales Order’ or ‘Cash Sale’
- Sync Orders Status (Default: Processing): Select the WooCommerce Order status on which the order will sync to NetSuite.
- *Note: If left empty, order syncs on Processing status by default.
- *Note: If left empty, order syncs on Processing status by default.
- Create Woo Orders Deposit: Enable it if you want to create customer deposit transaction records.
- Auto Create Invoice: Enable it if you want to create invoice for sales order, for the selected order status.
- Order Delete on NetSuite on WC Delete: If enabled, orders will be deleted from NetSuite when deleted in WooCommerce
- Enable Coupon Sync: with this option, you can sync coupons WooCommerce to NetSuite. Please make sure to select NS Promo Custom Form ID and NS Promo Discount ID.
- Display Tracking number: If enabled, it will display NetSuite order tracking number on Customer My Account dashboard.
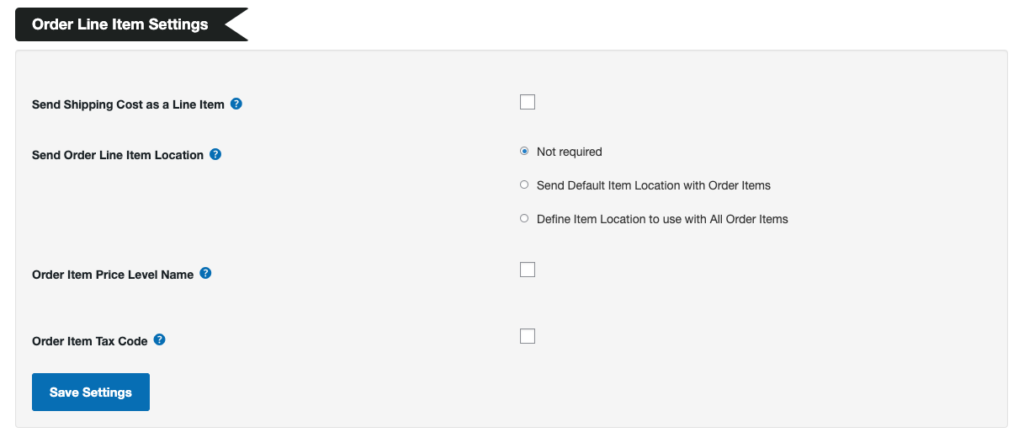
Order Line Item Settings

- Order Shipping Line Item Internal ID: Using this feature, you can send the Shipping Cost as an Order Item. You will need to specify the Shipping Item Internal ID from NetSuite.
- Send Order Line Item Location: Using this, you can send the location with order line items. You can select the default item location or set a custom location for the items.
- Order Item Price Level Name: If enabled, the price level will be sent with order items. Select the Price Level from the dropdown list.
- Order Item tax Code: You can enable it and select the taxcode of the Order Item you want to be synced with the order detail.
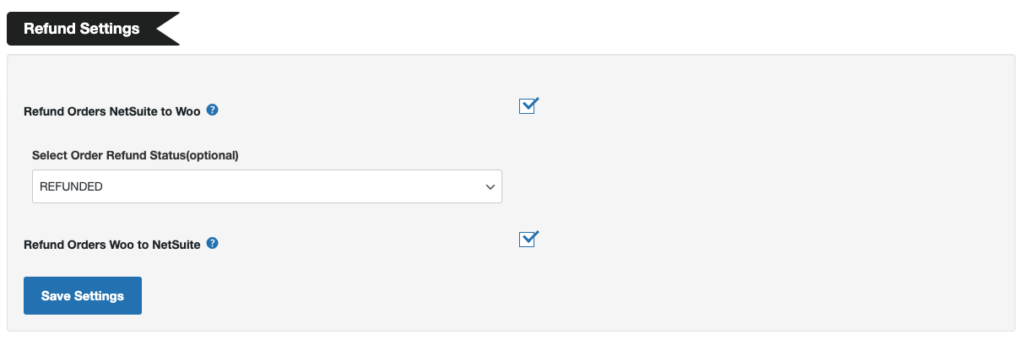
Refund Settings

- NetSuite to Woo: If enabled, the refunded orders will sync from NetSuite to WooCommerce.
- Woo to NetSuite: If enabled, the refunded orders will sync from Woocommerce to NetSuite.
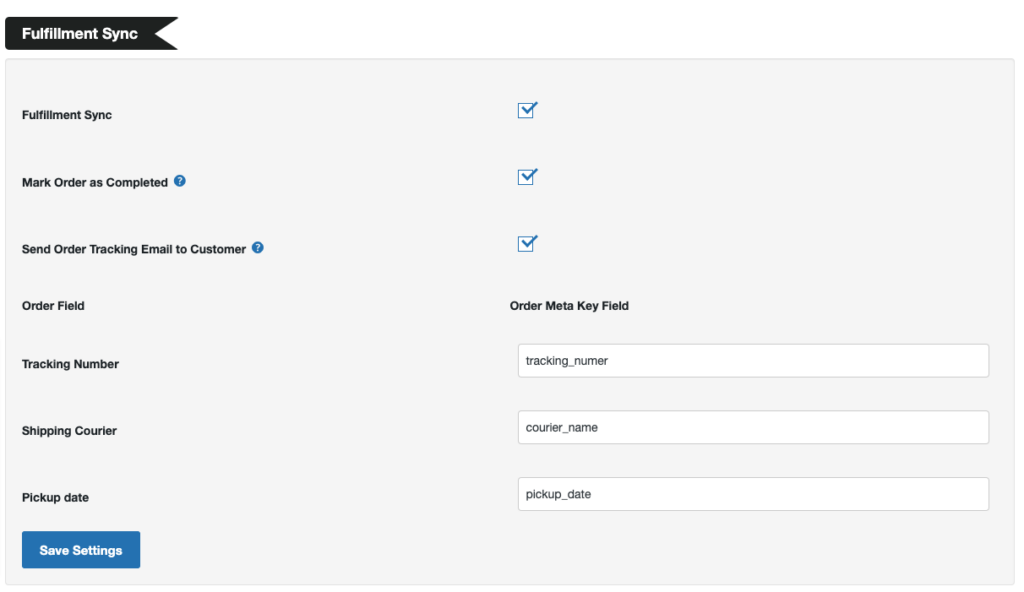
Fulfilment Sync

- Fulfilment Sync: By enabling this option, you can sync the fulfilled order from NetSuite to WooCommerce. Further options will be displayed after enabling this.
- Mark Order as Completed: With this option, fulfilled/billed orders will be marked as “Completed” in WooCommerce.
- Send Order Tracking Email to Customer: With the help of this option, an email including the tracking number will be sent to the customer on order fulfilment.
- Order Field with Order Meta Key Field:
- Tracking Number: In the Tracking number field, enter the value (for example – tracking_number) of the database field, where you want to save the tracking number, for any further use.
- Shipping Courier: In the Shipping Courier field, enter the value (for example – courier_name) of the database field, where you want to save the shipping courier name, for any further use.
- Pickup date: In the Pickup date field, enter the value (for example – pickup_date) of the database field, where you want to save the pickup date, for any further use.
The value you enter in the “Order Meta Key” is where the value for these three fields will be stored in database. These filed values will be sent to the customer when an auto email is sent to them after getting the tracking number from NetSuite.

Conditional mapping feature:
This feature allows you to map NetSuite data like classes, tax code, shipping method, payment method, or any other NetSuite field, from WooCommerce, be it a fixed value, or a value of a WooCommerce field.
Operation:
This is the first field you will see when you commence mapping the fields to NetSuite. The operation can be any of the following based on your requirements.
1. Map NetSuite Field to Fixed Value Based on WC Field Value :
With this operation, you can set a condition that if a WC Field has a certain value then you can send a fixed value to NetSuite Field. And if you choose this operation the fields further will be visible as follows –
- WC Field Source
This contains orders related fields that are used to map the values to NetSuite. It provides us with a pre-defined list of orders that can be mapped and also the option to insert a meta key to get order-related data. - Order Field
Select the WC field from the drop-down based on which you want to set a condition for mapping. - Where
Here you can select the condition type. We offer 4 types of conditions:- IS
- IS NOT
- CONTAINS
- DOES NOT CONTAINS
- WC Field Value
Enter the value that you want to check corresponding to the Order field or Order meta field. - Attribute Type
Here you can choose whether the field you are mapping is a Default NetSuite field or Custom NetSuite Field. - NS Field Type
Select the type of custom field such as String, Boolean etc.
*Note: You will only see this field for your custom NetSuite fields and not for the default ones. - NS Field
Select the name of the field from the dropdown list if it’s a default field or enters the NetSuite Field name if it’s a custom field. - NS Field Value
This needs to be selected record’s internal ID from NetSuite. For example, if you need to set up your subsidiary, navigate to Setup > Company > Departments
2. Map NetSuite Field to Fixed Value :
In this operation, you can send any Fixed Value to the desired Netsuite Field. And if you choose this operation the fields further will be visible as follows –
- Attribute Type
Here you can choose whether the field you are mapping is a Default NetSuite field or Custom NetSuite Field. - NS Field
Select the name of the field from the dropdown list if it’s a default field or enters the NetSuite Field name if it’s a custom field. - NS Field Value
This needs to be selected record’s internal ID from NetSuite. For example, if you need to setup your subsidiary, navigate to Setup > Company > Departments
3. Map NetSuite Field to WC Field :
In this operation, you can send any Fixed Value to the desired NetSuite Field. Upon choosing this operation, the fields visible further will be as follow:
- WC Field Source
This contains orders related fields that are used to map the values to NetSuite. It provides us with a pre-defined list of orders that can be mapped and also the option to insert a meta key to get order-related data. - Attribute Type
Here you can choose whether the field you are mapping is a Default NetSuite field or Custom NetSuite Field. - NS Field
Select the name of the field from the dropdown list if it’s a default field or enters the NetSuite Field name if it’s a custom field. - Prefix to append
Here you can enter any value to want to sync with the respected field. Leave blank if none. - Order Field
Select the WC field from the drop-down based on which you want to set a condition for mapping.